LassoMailer - Campaigns
Sending a campaign
Now that you’ve checked and rechecked your email to make sure it is as near perfect as it will ever be, it’s time to set your campaign to send.
Campaign List View
The first thing you’ll do is get back to the Campaigns tab, and then Manage Campaigns, so you see the list of your campaigns in the window underneath.
You will see a list of all your email campaigns past and present.
- Campaign Name: The internal name you applied to your campaigns
- Subject: The subject line for all of your campaigns—that the public will see
- Status: Change the status of a Campaign to Active / Inactive
- #Lists: View the number of lists selected for that Campaign
- Sent: The last date a particular campaign was sent
- #Subscribers: View the number of subscribers for each Campaign
- View campaign Details: Brings you to the campaign details window, same as clicking on the title of the campaign
- Preview your campaign: Preview the campaign's HTML version
- Edit: Click the green pencil to go back into the campaign editing windows
- Delete: Destroy all of your hard work on the campaign. Deleting the campaign will not delete any affiliated lists.

Campaign Details
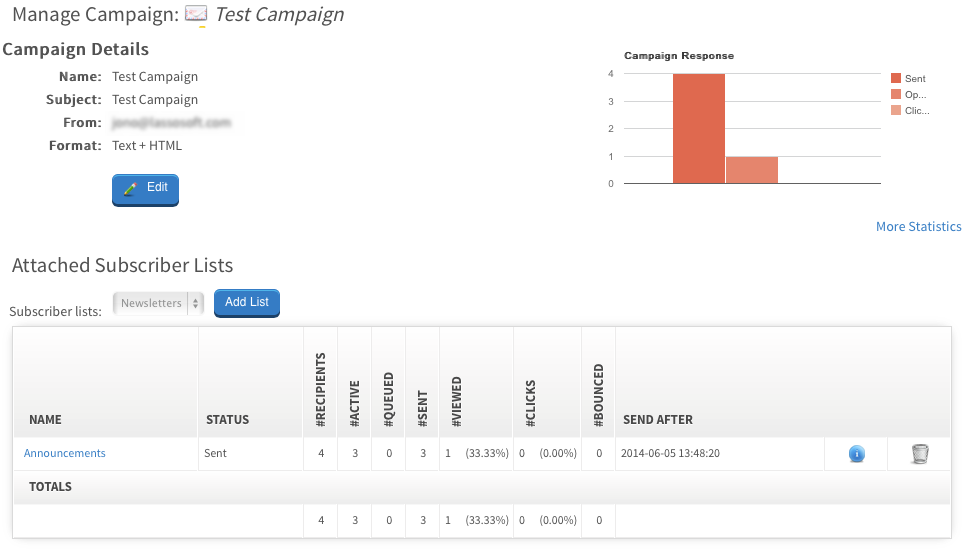
Click the campaign's name, or the "View Campaign Details" icon to view the campaign's details and begin to queue messages to deliver to subscribers.
Note: In order to send your campaign, you’ll need to make sure it’s Active. If the message above the recipient lists informs you that "Campaign is inactive and will not queue to send until activated", return to the "Campaign list view" and make active. In that view clicking the green"tick" or the red "X" will toggle the status of the campaign.
To Edit the campaign further, click the "Edit" button.

Subscriber Lists
The Subscriber Lists listed are those that you have previously attached to the campaign, and will display various statuses:
- Waiting: The list has not been released to be delivered to recipients.
- Released: The list has been released to the queue but has not yet begun pre-processing.
- Queued: The list has begun pre-processing. The list may have also started the delivery stage.
- Sending: The list has finished pre-processing and is now in the delivery stage.
- Sent: The list has left the local environment. The individual emails will either be transitioning through the Lasso Mail Queue, the SMTP server, or in subscriber inboxes.
- Partial: The list has been sent, but new subscribers have been added since so is deemed a partial send.
To attach a new list to the campaign, select the list from the dropdown and click the "Add List" button. Note that only active lists that have not already been attached to the current campaign will be visible in this dropdown.
The list view also displays the following columns:
- #Recipients - The number of possible recipients in this subscriber list, including inactive and unsubscribed addresses
- #Active - The number of currently active subscribers
- #Queued - The number of subscriber emails pre-processed and not in the delivery stage. This is a transient number - this number will only be greater than zero during the processing stage.
- #Sent - The number delivered to the mail queue. This number may be greater than the #Active if users have unsubscribed since the campaign was released, and less if too if new users have subscribed.
- #Viewed - The number of subscribers who have viewed the email. This number is prone to underreporting as some mail services will strip tracking codes from emails prior to delivery to inboxes.
- #Clicks - the number of links clicked in the delivered messages.
- #Bounced - the number of bounces captured for the subscribers to this list for this campaign.
- Send After - The date/time the list has been scheduled to begin processing. If the list has not yet been released this will display "No pending sends"
Each list's statistics are displayed with a total for all subscribers at the foot. Note that the totals count unique subscriber events - if a user is subscribed to more than one list they are counted once in the total statistics.
More information on interpreting statistics can be found in the "Interpreting Statistics" section.
Releasing a list to send, and viewing subscriber activity
To release a list to the queue system, or to view the discrete subscriber events for the campaign click the list name in the campaign's attached list view.
On the next screen the list subscribers are shown.
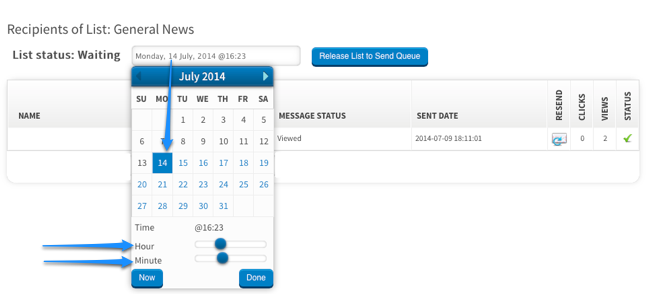
If the list has not been released to the queue:
The "List Status" will be "Waiting" and a field displaying the current date & time (plus any offset specified in the "Send Delay" Settings). Clicking into this field will reveal a date & time picker. Choose a date & time and click the "Release List to Send Queue". The subscriber will begin processing at this time or soon after.

If the list has been released:
The List status will be one of Released, Queued, Sending, Sent, or Partial as described above. An additional button will also be visible - "Queue and sent to new list members". This button will add to the queue any new subscribers for the next available processing opportunity.
Individual Subscribers:
A line item is displayed for each subscriber to this list. Their name (if entered) and their email address is displayed, together with the individual message status:
- Clicked - subscriber has clicked on a link in the email
- Viewed - subscriber has viewed the email
- Bounced - a bounce was recorded for this address
- Unsubscribed - the user has opted out of future emails
- Sent - the message has been delivered
- Queued - the message has been queued and is awaiting delivery processing.
It is implied that if a message has been clicked, then it has also been viewed. Similarly if a message has been clicked or viewed then it has not bounced.
An individual message can be re-sent to a subscriber by clicking the re-queue icon as long as it has been sent and the user has not unsubscribed (i.e. is still active).
The number of click and view events are also shown for each user.
LassoSoft Inc. > Home
©LassoSoft Inc 2015 | Web Development by Treefrog Inc | Privacy | Legal terms and Shipping | Contact LassoSoft
