LassoMailer - Campaigns
Creating a new campaign
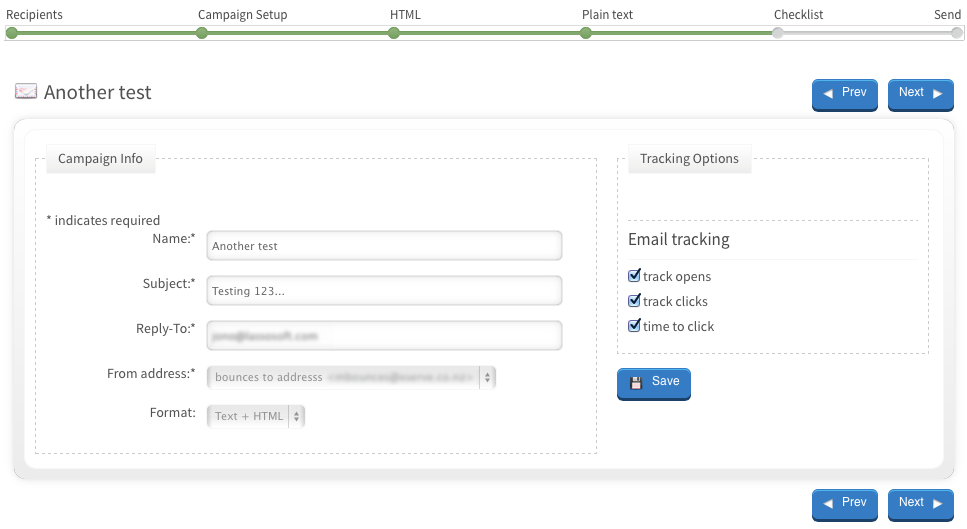
Under the main Campaigns tab, select the tab marked “New Campaign”. You will be brought to the campaign setup window. This window presents a kind of timeline across the top, offering you the sequence of the steps needed to create your campaign properly. You can skip ahead or go back to any point in the timeline if you wish by clicking on the name of the setup set eg ‘HTML’, or ‘Checklist’
Recipients
The Recipients section refers to the lists you wish to apply to your new campaign. Select a list from the drop down menu to choose which list will receive this campaign.
If you’d rather select the list (or lists) after your campaign is created, simply jump ahead either by clicking on a different heading in the timeline, or the “Next” arrow at the bottom right of the window.

Campaign Setup
Name: This field is for internal use only. The outside world will not see the name you apply to this campaign. This field is for your own organizational purposes. Make sure to call the campaign something that you can easily identify by looking at it later on.
Tip: If you’re intending to conduct multiple campaigns, as in a bi-weekly newsletter, it will help to develop a consistent naming criteria ahead of time.
Subject: This is what your list recipients will see as the subject line to the email they receive. Try to choose an email subject heading that will inspire people to open your message and read it.
Reply to: This address will be used to collect active replies to this campaign’s email message. This must be an active address of someone in your company so replies can be seen in their mailbox and responded to. The person who manages the Replies can be changed with each campaign, so if you have one campaign for inside sales one week, and another for outside sales the next, each can have the correct sales manager to manage the replies.
From address: This will display the identity of your company as the sender, but is for a System Only email address eg Broadcast@website.com, or newsletter@website.com. It is recommended that this address be affiliated with a person’s name from your company, and this can be done by our technical people during setup to look like “
Note: please do not attempt changes on this. Any changes made will make you liable for support costs to correct and restore your mail sending.
Format: You can choose between Text (plain text) and HTML (images, graphics and styled text) or a combination of both. These days, most people can receive and read HTML emails, but not all. We recommend that you leave the default selected, which sends your email broadcast as both HTML and Plain Text at the same time. You’ll be asked to set up the Plain text version later in the campaign development process.
Tracking Options
By default, all of the tracking options for your campaign are on. “Track opens” will log how many recipients opened your message, “track clicks” will log how many of those people clicked on something, and “time to click” gives you an idea of how long it takes a recipient to click on something after they have opened the message.
Note: you cannot unset these settings. They are there for information only.

HTML
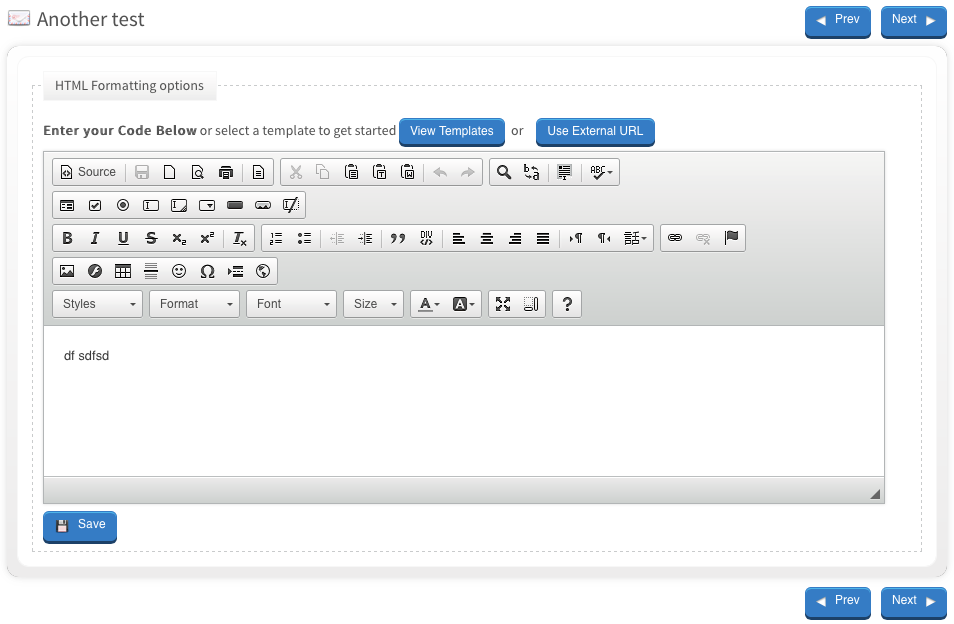
The HTML section is where you will set up the content of your email campaign. You can do this in a few different ways. LassoMailer allows you to either use the WYSIWYG editor to design an HTML formatted email from scratch, copy and paste HTML from a source editor, or pull content from an existing web page.
HTML (designed) Content – Pull from a web page
To use this option, create a webpage on your website. Copy and paste the web URL of your page into the Enter External URL field. LassoMailer will gather (Fetch) the content from the page and transport it into the content frame.
Note: Email Servers and Mailbox Applications are not as sophisticated as current web browsers. Mail broadcasts built on a web page must use email-specific, mailserver safe coding conventions. Fetching a regular webpage will not work. There are many tools out there to show you what works and what doesn't. Using the QuickTest in LassoMailer will also demonstrate where any web code you have used will not work successfully.
*Do NOT use Javascript on your email broadcast pages. This WILL get your email marked as spam.
Using Images in your Broadcasts
Image URL's: Images for email broadcasts must have absolute URL's, for example http://www.lassosoft.com/skins/lassosoft/images/main_logo.png - . If you do not do this, your images will appear as a blank box in your email.
Ratio of Image to Content: The amount of Image to text content has a maximum ratio that is measured in anti-spam filters on email servers around the world. You must have more text content than images in your email to receive the lowest ‘spam’ score for this measure. We find that 25% -35% images to 65-75% text is a good balance.
Image Sizing: Another critical part of using Images is to have them at the correct size BEFORE you include them in the email. For email, the end users machine may not be able to read the size ‘adjustment’ settings, so will display the original (full) image.
If you have an image that is wider than the content section of your email broadcast page template, save it and include it at a reduced file size, and it will be presented correctly to recipients of your email.
HTML (designed) Content – Direct entry
The HTML page also includes some editing tools if you want to make changes inside the Email that won’t be visible on the web-page version of your email. LassoMailer uses the CKEditor toolkit. Please refer to the CKEditor website and documentation if required.

Plain Text
There are still some people out there who do not have HTML activated in their email programs. These people will not be able to read your pretty HTML formatted messages.
To make sure you cater to all your email recipients’ needs, it is always recommended that you create an effective plain text version of your email message.
Having a plain text version of your email is also a positive ‘anti-spam’ move. Emails with both HTML and Plain Text options included are considered more likely to be valid email.
The nature of plain text is that it contains no images, no fancy tables, no spinning, twirling animated fire-breathing logos. Any links you include will be shown in their stark ugliness—you can’t hyperlink words or use any HTML.
For the reasons above, plain text versions of emails should be thought of differently. Consider taking the important parts of your email message and putting them in an easy to read sequence. Organize and tidy up your links. Use paragraph spacing wisely. Try to think of what is essential in a text-only email.
Checklist
From your Campaigns window, click into the Campaign you are working on, Click Edit. The item Checklist appears in the progress bar at the top.
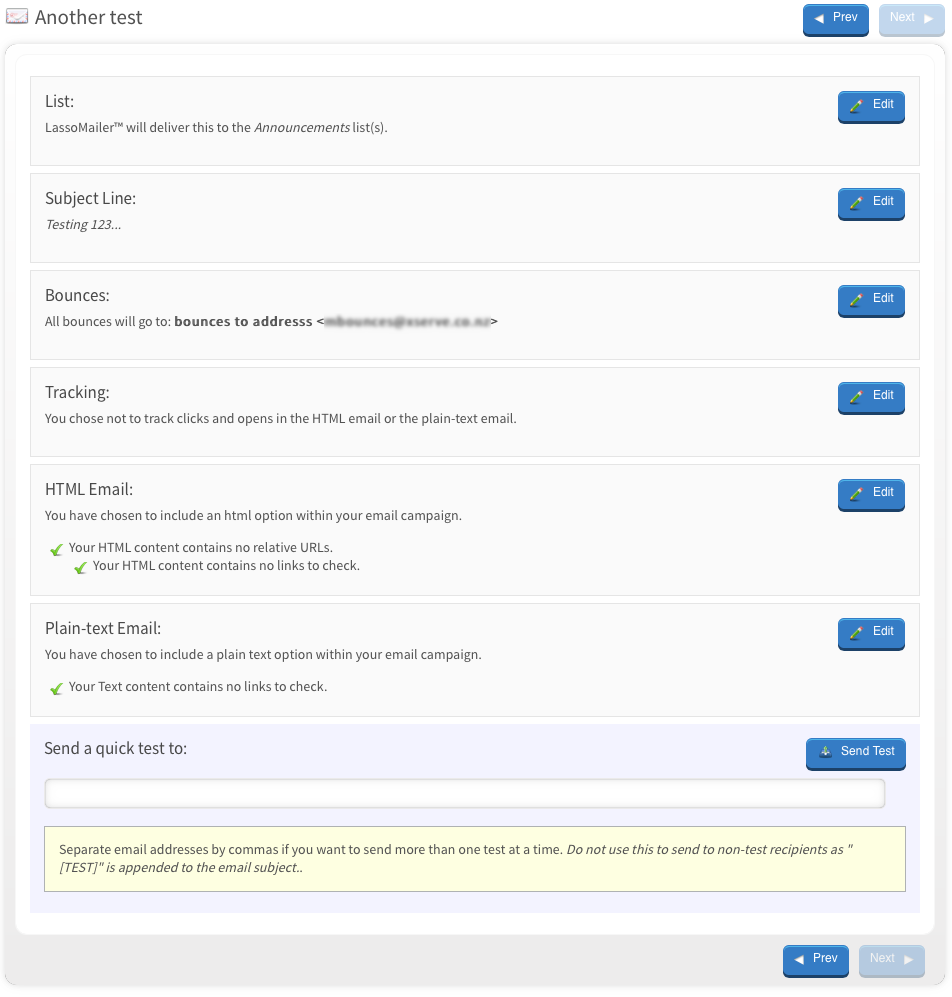
The checklist window provides an overview of all the parts of your campaign. It will indicate if something is missing or formatted incorrectly, so you can go back in and edit if need be. If anything is missing, LassoMailer will call attention to it on this checklist so that you can fix it. Just click on the edit button beside the problem section of the campaign to make edits.

When you are sure that you’ve prepared the campaign properly, you can use the field at the bottom to send a Quick Test to yourself, or someone else who can verify the contents of the message. Simply enter an email address (or multiple addresses separated by commas) in the quick test field, and click “Send Test”. It will show in your email inbox with [TEST] confirming it’s from this point in the process.
You can repeat this test as often as you need to confirm the best layout and setup of your email. Always do this step before doing a formal send from the mail release area. Once sent from the mail release area you cannot easily re-send as it comes under the systems anti-spam protection control.
Next steps
You're now ready to send your campaign to one or more recipient lists!
LassoSoft Inc. > Home
©LassoSoft Inc 2015 | Web Development by Treefrog Inc | Privacy | Legal terms and Shipping | Contact LassoSoft
