- Default
Lasso 9.3 Release Notes and Downloads
Includes LUX, Spitfire & Trident
Please read the installation notes that pertain to your system as well as the general notes below. The supported platforms are listed with quicklinks on the right of this page.
Important Note for 9.3.1: A current unresolved issue with a Java function on Windows affecting PDFs may mean that Windows users may wish to hold off on installing unti the fix is announced. LDAP functions are also still on the workbench.
Security Note for 9.3.1: All versions of LUX shipped with versions prior to 9.3.1-4 are affected by a security issue with the LUX interface. Although no cases of affected systems have been reported, we strongly recommend all users either update to 9.3.1-4, update their copy of lux.lassoapp to the version shipped with 9.3.1-4, or restrict access to port 8090.
IMPORTANT! Before you install/upgrade, check the requirements below.
Requirements:
- Java JRE 8 is now the minimum supported version of Java on OS X. Please obtain and install the JRE directly from Oracle (http://www.oracle.com/technetwork/java/javase/downloads/index-jsp-138363.html#javasejre)
- Apple's Java 6 is also required on OS X 10.11 and later due to an outstanding bug in Oracle's Java distribution. (https://support.apple.com/kb/dl1572)
CURRENT installer: Lasso-Server-for-Mac-9.3.2-b5.zip
old installer: Lasso-Server-for-Mac-9.3.1-4.zip
- This release will install a module for Apache 2.2 on OS X 10.7 - 10.9 and Apache 2.4 on OS X 10.10 and later. Upgraded versions of OS X can re-run the installer to re-install the module if necessary.
After running the installer, open http://localhost:8090/lasso9/lux in a browser to complete the installation.
Lasso 9.3.1 for CentOS 5
Requirements:
- x86_64 CentOS 5 (if installation on a 32-bit operating system is required, please continue to use Lasso 9.2.7)
- SELinux disabled or set to permissive mode
RPM download: Lasso-Instance-Manager-9.3.1-4.el5.x86_64.rpm
Installation via YUM: see http://centosyum.lassosoft.com
After running the installer, open http://server-domain.name:8090/lasso9/lux in a browser to complete the installation.
Lasso 9.3.1 for CentOS 6
Requirements:
- x86_64 CentOS 6 (if installation on a 32-bit operating system is required, please continue to use Lasso 9.2.7)
RPM download: Lasso-Instance-Manager-9.3.1-4.el6.x86_64.rpm
Installation via YUM: see http://centos6yum.lassosoft.com
After running the installer, open http://server-domain.name:8090/lasso9/lux in a browser to complete the installation.
Lasso 9.3.1 for CentOS 7
Requirements:
- x86_64 CentOS 7
RPM download: Lasso-Instance-Manager-9.3.1-4.el7.x86_64.rpm
Installation via YUM: see http://centos7yum.lassosoft.com
After running the installer, open http://server-domain.name:8090/lasso9/lux in a browser to complete the installation.
Lasso 9.3.1 for Ubuntu 14.04+
Requirements:
- x86_64 Ubuntu 14.04 (if installation on a 32-bit operating system is required, please continue to use Lasso 9.2.7)
- note that Ubuntu 15 and later replaces upstart with systemd, which Lasso hasn't yet been ported to on this platform
DEB download: lasso-instance-manager_9.3.1-4_amd64.deb
Installation via APT: see http://debianrepo.lassosoft.com
- to continue using Lasso 9.2.7 on Ubuntu, use the "legacy" directory instead of "stable":
sudo add-apt-repository "deb http://debianrepo.lassosoft.com/ legacy main"
After running the installer, open http://server-domain.name:8090/lasso9/lux in a browser to complete the installation.
Lasso 9.3.1 for Windows Server 2012
Please read the Windows Server 2012 Installation Instructions here
Lasso-Server-with-LUX-9.3.1-4-Apache2.exe
Lasso-Server-with-LUX-9.3.1-4-IIS.exe
Lasso 9.3 is a significant evolution of the Lasso product line, and as such there are a number of changes included from the ground up, and so we recommend thorough testing before deploying; LassoSoft cannot assume responsibility for issues arising from installations of beta or release candidate software.
9.3 Install walkthrough
What to expect upon installation:
To access the Lasso 9.3 LUX admin UX:
http://localhost:8090/lasso9/lux/ (NOTE: update "localhost" with the correct IP or hostname if needed)
NOTE: the original admin URLs from older versions of Lasso 9 (9.1/9.2) are no longer valid and should automatically redirect to the pattern above.
IMPORTANT!: port 8090 is Lasso 9.3's dedicated administration port. This is for several reasons:
- LUX is served using Spitfire, rather than Apache or IIS
- a separate port can easily be firewalled
- LUX via Spitfire has its own security credentials
Please make sure this port requirement is noted and permitted in your enviroment.
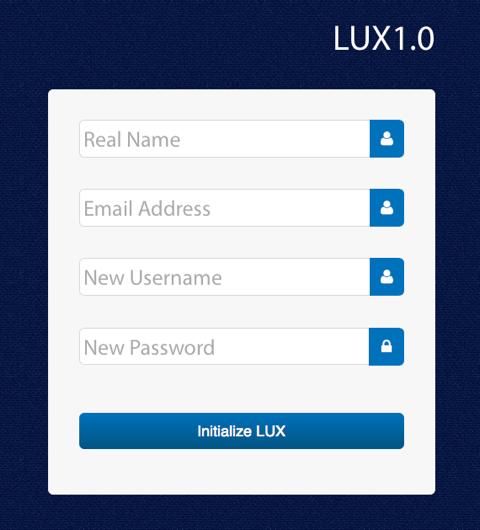
Initialization
When you first hit the LUX admin URL you will be asked to initialize it:
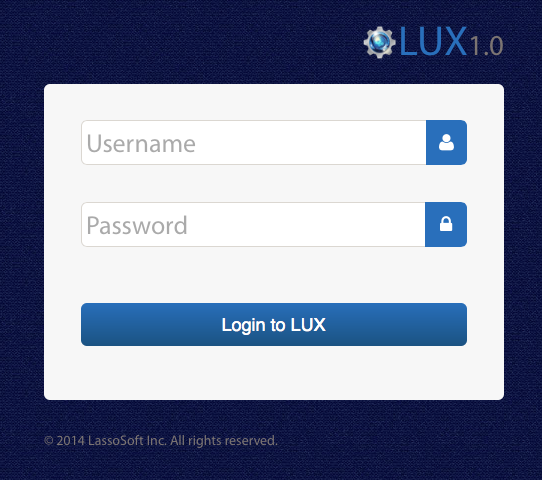
Once you enter the details you will be asked to log in:
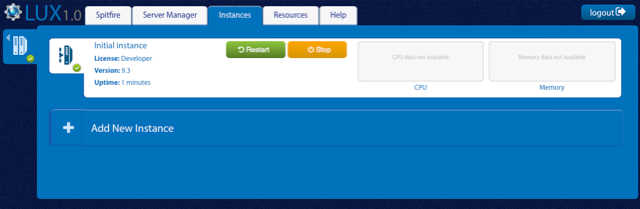
On log in you will see the following screen. Your user is automatically granted "Server Manager" privileges during the setup process:
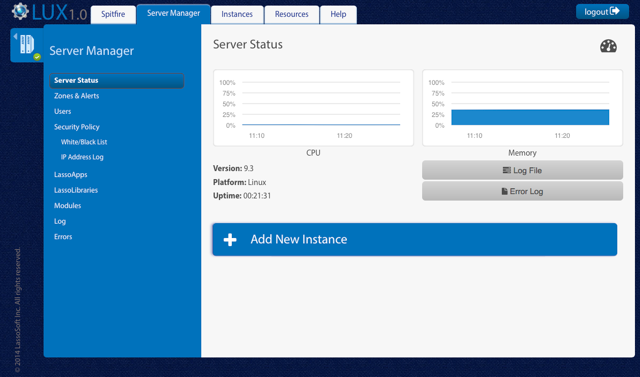
The above screenshot is a "clean" install and as such has no instances.
Your CPU and Memory graphs may not display immediately, as they require a few minutes of data to be able to reflect actual usage.
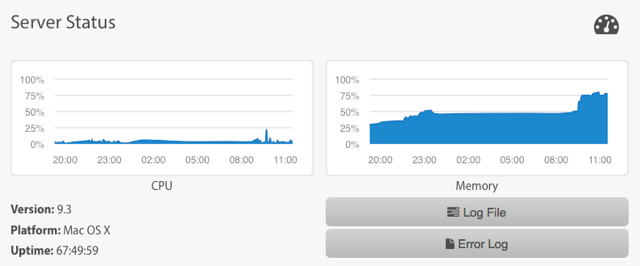
Once installed the statistics will be collected and displayed. Note that this displays only the last 24 hours, so will need to run for an hour or two after initial install to have sufficient data to review meaningfully. Below is a screenshot sample of what a working systems Server Status graphs might look like:
Adding a new Lasso Instance
Adding an instance is done by clicking the "Add New Instance" button.
The Add Instance process under 9.3 is almost the same as under the previous Lasso 9.x "Instance Manager".
NOTE: you must enter a valid and accessible "Management URL" for the Add Instance to be successful. Do not use spaces or special characters. See the screenshot below for an example of what this looks like.

The management url is the domain name e.g. www.myurl.com
After the instance is created you are redirected back to the Server Manager dashboard. To get to the instance you can either click "in" the instance's box, or see it in the instance list at http://10.10.1.105:8090/lasso9/lux/instance (insert your IP or hostname)
This view is the default for a user without "Server Manager" privileges.
Spitfire Configuration
About Spitfire
Spitfire is Lasso 9.3's dedicated web server, and runs full time to manage Lasso's UX (LUX) and associated processes.
Port 8090 is reserved for the admin UX.
Spitfire can also be configured to run as a lightweight replacement for Apache or IIS. Instances run as "sandboxes", and can be configured to respond to specific ports and hosts.
Configuring Spitfire as a general purpose Webserver
First, turn your "normal" webserver such as Apache off.
- Select the "Spitfire" tab.
- Select the instance you wish to configure Spitfire access to.
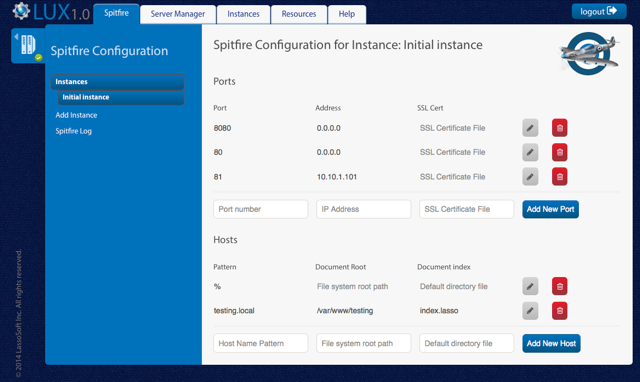
You will be presented with two types of configuration: ports, and hosts.
Ports
Ports can be bound to IP addresses and SSL certificate files.
In the screenshot below you will see that the instance has been configured to allow ports 8080 and 90 to be accessed by any IP address (0.0.0.0*)
Port 81 has been bound to only accept connections from the IP address 10.10.1.101
* 0.0.0.0 is synonymous to "all IP addresses". In the UI in a later beta you will be able to select "any" or an IP address.
Hosts
Hosts define what hostname the instance will respond to, the document root and default index file.
You could, for example, have two instances both responding to port 80 but with different hostnames - exactly like Apache does now.
We do encourage a "fallback wildcard" on an instance, otherwise you will receive a "no instance configured for this hostname" error for an unspecified host.
If is also possible to specify wildcard hosts. %test% would then instruct Spitfire to respond to testing.local and www.test.com
Automated Reloading of Spitfire Config
You don't need to do anything at all to make Spitfire recognize changes to the configuration.
There is a background watcher that will recognize changes and triggers a reload of Spitfire within a few seconds of any config change.
Reporting Issues
LUX has built-in issue submission, directly in the UI.
On the "Help" tab, there are currently 3 menu items - "Contact LassoSoft Support", "Search LassoTrac Issues", and "Submit Issue Ticket".
If you find what you consider is an issue with 9.3 or LUX, please log it using "Submit Issue Ticket, and select Lasso 9 (core), LUX (admin), or Documentation (not working as documented).
NOTE: Lasso 9.3 requires outside net access for the connection to LassoSoft's API's for most of the functionality in the Help tab, as well as for the initial collection & caching of data in the Resources section.

General principles and guide to using Lasso can be found on http://lassoguide.com
 Please note that periodically LassoSoft will go through the notes and may incorporate information from them into the documentation. Any submission here gives LassoSoft a non-exclusive license and will be made available in various formats to the Lasso community.
LassoSoft Inc. > Home
©LassoSoft Inc 2015 | Web Development by Treefrog Inc | Privacy | Legal terms and Shipping | Contact LassoSoft