- Articles
Lasso Server 9.3 Installation for Windows Server 2012
Supported Platforms
This article discusses Lasso Server 9.3 installation for the AMD64 CPU version of Windows Server 2012.
Note that this release is still in Beta and should not be used on production machines until on a full supported release.
Downloading: 3 required files
[Before you start: make sure Lassosoft.com is permitted in your servers default browser1.]
1. Lasso Server The Lasso Server 9.3 for Windows Server 2012 installer download can be found from the download-archive page http://www.lassosoft.com/downloads_browse
On that page, navigate to "Lasso Server", then to "BETA" (this will be moved into the main WIN directory on official release), then select to download the Lasso 9.3 executable installer corresponding to your needs. Choose one of:
2. Web Services: Either
Apache 2.2: Lasso-Server-with-Instance-Manager-Apache2.2-9.3.0.exe
OR,
Microsoft Internet Information Services: Lasso-Server-with-Instance-Manager-IIS-9.3.0.ex (not ready yet)
3. ImageMagick
Lasso 9.3 requires ImageMagick 6.7.7-7-Q16. As of January 14th, 2015, this file can be found here: http://ftp.sunet.se/pub/multimedia/graphics/ImageMagick/binaries/ImageMagick-6.7.7-7-Q16-windows-x64-dll.exe
Microsoft IIS Part 1: Install and Setup
To install IIS, follow these steps. If it's already installed, please review the "Role Services" step below to ensure that "ISAPI Extensions" and "ISAPI Filters" are installed.
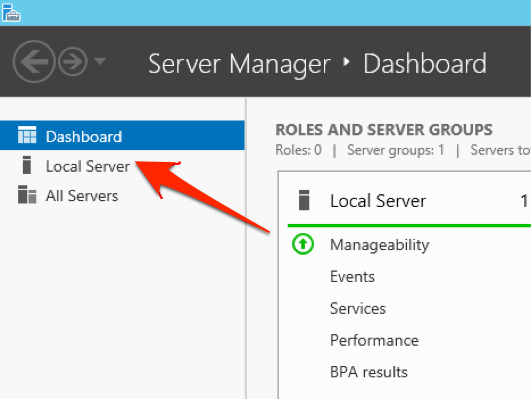
Open the "Server Manager", as shown below.
- Click "Local Server", as shown below
- Scroll down to the "ROLES AND FEATURES" section. Click the "TASKS" drop-down menu to its right (as shown, below) and click the "Add Roles and Features" item.

- Choose "Role-based or feature-based installation" and click the "Next >" button.
- Choose "Select a server from the server pool", choose the server from the "Server Pool" section, then click the "Next >" button.
- In the list of "Roles", place a check-mark in the check-mark box for "Web Server (IIS)". A window will open. Click its "Add Features" button, which will close it. Click the "Next >" button.
- In the "Features" list, you needn't make any changes. Click the "Next >" button.
- On the "Web Server Role (IIS)" page of the wizard, click the "Next >" button.
- On the "Role Services" page of the wizard, in the "Role services" section, scroll down until you find "Application Development". Expand that item. Place check-marks in the check-mark boxes for "ISAPI Extensions" and "ISAPI Filters". Click the "Next >" button.
- On the "Confirmation" page of the wizard, click the "Install" button.
- When IIS is installed with its "ISAPI Extensions" and "ISAPI Filters" and you have at least one web-site configured, you can proceed to install Lasso 9.3. Refer to the "Lasso Server 9.3 Install and Setup" section, below, then proceed with IIS Part 2: Configuration
Apache Part 1: Install and Setup
If you are using Apache instead of IIS, follow these instructions.
These instructions are not yet available. Please see the instructions for Lasso 9.2: http://www.lassosoft.com/Lasso-Server-9-Windows-Installation-Guide?#heading5
ImageMagick Install
Lasso 9.3 with LUX requires ImageMagick 6.7.7-7-Q16. You will need to install this from the file you downloaded earlier. Be sure to "Add application directory to your system path" during its installation.
Lasso Server 9.3 Install and Setup
Installing Lasso 9.3 for Windows Server 2012 is very simple. Double-click the installer file you'd downloaded earlier, read and be sure to accept the agreement, then perform a "Typical" installation. During installation, certain dependencies might need to be installed, such as the "Microsoft Visual C++ 2012 Redistributable (x64)" software.
After installation, navigate to the LUX (LassoUser-eXperience) Admin panel by using the following path:
http://localhost:8090/lasso9/lux/
NOTE: update "localhost" with the correct IP or hostname if needed
Microsoft IIS Part 2: Configuration
Instructions from here on are for IIS configuration after Lasso 9.3 and ImageMagick are installed
- Once Lasso 9.3 has been installed, here are the steps to follow in order to instruct IIS to send requests for Lasso source-code files to the Lasso connector for IIS.
- In the "Server Manager", click the Tools menu at the top, then choose the "Internet Information Services (IIS) Manager".
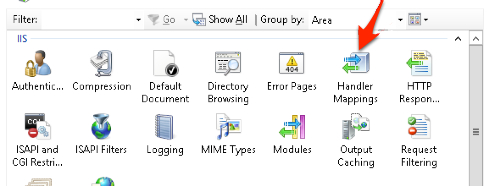
- Select your web-site on the left, then double-click the "Handler Mappings" item in the central part of the window, as shown below.
- In the "Actions" section on the right, click "Add Script Map..."
- For the "Request path", type: *.lasso
- For the "Executable", type: C:\Windows\system32\isapi_lasso9.dll
- For the "Name", type: Lasso9Handler
- Click the "OK" button. A window will ask you if you wish to allow the ISAPI extension. Click its "Yes" button.
Apache 2.2 Part 2: Configuration
Instructions are not yet available. Please see the instructions for Lasso 9.2 as a guide, noting that the section for the 'Instance Manager' is no longer relevant.
Last Step: Read the Release Notes
Read through the Release Notes page that contains a screen by screen walkthrough of the new LUX admin interface. This is found here: http://www.lassosoft.com/Lasso-9-3-release-notes
Before installing
Important: Previous versions of Lasso Server 9.x must not be installed on your Windows Server 2012 before installing Lasso Server 9.3.
1In a default installation of Microsoft Windows Server 2012, Microsoft Internet Explorer is set to block most web-sites.
In order to visit the Lassosoft web-site, you'll need to add an exception. Visit LassoSoft's download-archive page from your Servers Browser at http://www.lassosoft.com/downloads_browse 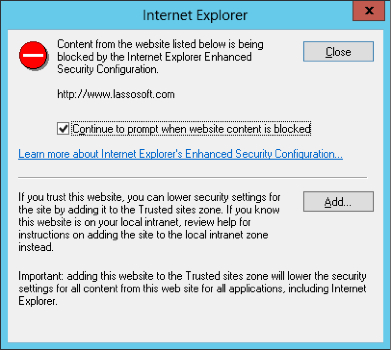
Then click the "Add" button to add the Lassosoft.com web-site to the list of allowed web-sites.
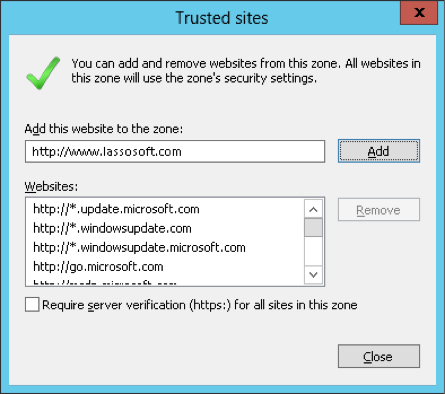
Then click the "Close" button.
 Please note that periodically LassoSoft will go through the notes and may incorporate information from them into the documentation. Any submission here gives LassoSoft a non-exclusive license and will be made available in various formats to the Lasso community.
Table of Contents
Random User Tips
Use
<? then the word 'LassoScript'
lasso_code('lost rhino');
this = is_just('a lost rhino');
//this is a comment
?>
For more Articles, Methods, Tags, References and Tutorials see LassoDocs

LassoSoft Inc. > Home
©LassoSoft Inc 2015 | Web Development by Treefrog Inc | Privacy | Legal terms and Shipping | Contact LassoSoft